Wednesday, May 17, 2023

MM17- Material master mass update


Update planned delivery time in Material Master data

Concept: The MM17 is the mass maintenance transaction in the SAP. MM17 executes transaction code MASS with the following options and default parameters set. You can use MM17 for mass changing of material master data (if something cannot be accomplished by this transaction it can be done using LSMW, BDC or BAPI).

Mass creation is never considered to be end user’s responsibility, but as a module specialist you may need to work on MM17. In case of LSMW, BDC or BAPI, it is developers or consultant’s work. So, you do not have to understand in detail, you just must know the concept, and that there is this kind of possibility for mass data maintenance.


Prerequisite to execute this step is that we require list of Materials for which the planned delivery time need to be uprated.
1. Enter MM17 in the command area of SAP Easy access screen & hit enter.

2. Select the table MARC & click on execute icon

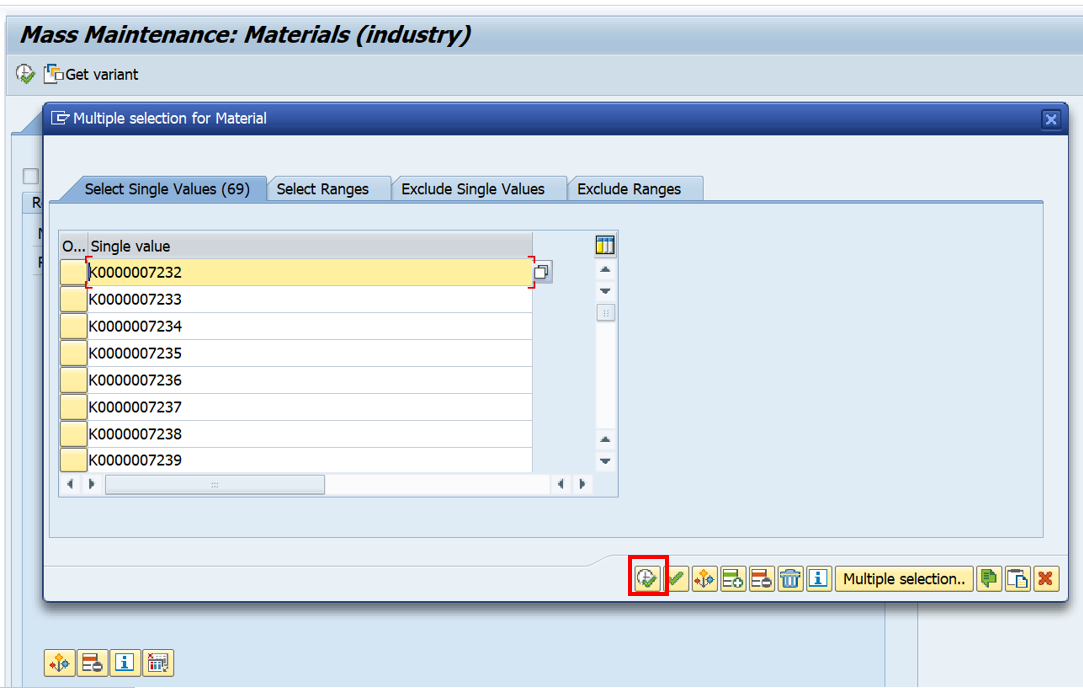
3. Click on the following icon to select the materials


4. Enter the list materials for which the Origin group & click on execute icon

5. Click on execute icon

6. Click on the following icon to enter Valuation area (Plant) & click on execute icon


7. Click on the execute icon to proceed further

6. Click on the following icon to select the field (Planned delivery time) to change the material master data.

7. Click on the following icon to select the field (Planned delivery time) to change the material master data.

The field gets shifted to left side, click on continue icon or press Enter  


8. Enter the planned delivery time in the following field
Select the column for which we have to change values in mass.
Select following icon to preform mass changes 

9.Because of this mass change function, value of planned delivery change will get changed, click on test icon to test the inconstancies in the values to be changed


No issue observed during the mass change

10. Click on save icon to following data to be filled to save the changes.


11. We can cross check the material master
Enter MM03 in the command area of SAP Easy access screen


Enter material & hit enter

Select MRP2 view

Enter plant

 Check the value of Planned delivery time

Wednesday, April 12, 2023

Comparison between Cost Planning methods of SAP PS


SAP Project System (PS) is an integrated project management tool that supports various aspects of project planning, execution, and control. One of the critical features of SAP PS is cost planning, which allows project managers to estimate, allocate, and control project costs effectively. We will discuss the advantages and disadvantages of cost planning methods available in SAP PS in this blog post.

SAP PS offers different cost planning methods that cater to various project requirements and complexities. Understanding the advantages and disadvantages of each method can help project managers choose the best method for their projects. SAP PS provides the tools and features needed to effectively plan, control, and monitor project costs.

Tuesday, March 21, 2023

Importance of Overhead class in SAP PS Module


In SAP PS (Project System), the overhead class plays an important role in managing project costs. It is used to group cost elements that are not directly associated with a specific work package or activity in the project.
The importance of the overhead class in SAP PS can be summarized as follows:

Cost Allocation: The overhead class is used to allocate indirect costs to the project. These indirect costs can include administrative overhead, depreciation, rent, and other expenses that are not directly related to a specific work package or activity in the project. By grouping these costs into an overhead class, it becomes easier to allocate them to the appropriate cost objects in the project.
  • Cost Planning: The overhead class is also used in cost planning for the project. When planning project costs, it is important to include all indirect costs that will be incurred during the project. By using the overhead class, these costs can be easily identified and included in the overall project cost estimate.
  • Cost Control: The overhead class is also used in cost control for the project. By tracking the actual costs associated with the overhead class, it becomes easier to monitor project costs and make adjustments as necessary. This can help ensure that the project stays within budget and that any deviations are identified and addressed in a timely manner.
  • Reporting: The overhead class is used in reporting on project costs. By grouping indirect costs into an overhead class, it becomes easier to generate reports that show the overall project costs, including both direct and indirect costs. This can provide valuable insight into the project's financial performance and help stakeholders make informed decisions about the project.
In summary, the overhead class is an important element in SAP PS as it helps to allocate, plan, control, and report on indirect costs associated with a project. It is a powerful tool for managing project costs and ensuring that projects stay within budget and deliver value to stakeholders.

How to integrate SAP PS with Cross Application Time Sheet (CATS)


Business Scenario:

SAP PS (Project System) is a module in the SAP ERP system that supports project planning, execution, monitoring, and control. On the other hand, CATS (Cross-Application Time Sheet) is an SAP module that enables employees to record their working hours and tasks performed.

The integration between SAP PS and CATS allows for the seamless flow of data between the two modules. This integration allows project managers to monitor the progress of the project in real-time by accessing time and effort data from employees.

The integration enables the following features: Employees can record their working hours and the tasks they perform directly in CATS.
The data from CATS can be transferred automatically to SAP PS to provide accurate and up-to-date information on project progress.
Project managers can use this information to monitor project performance, manage resource allocation and costs, and adjust project plans as needed.
The integration also helps in automating the billing process by accurately recording employee's working hours and the tasks performed.

Prerequisite:

a) Creation of Work Center (t code CNR1)- Create a work center with work center category 0006-Project Management for Capacity category 002-Labor

Enter working hours in the Work center (operating time, length of breaks, number of individuals, percentage of Capacity utilization etc.) to calculate the capacity 

b) Link HR personnel’s (HR master data) in the Work center- 


c) Maintain KP26 rate for Activity type & Cost center (which was assigned in the Work center in the costing tab)


d) Capacity requirement checkbox should be active at Network header level


Step by step procedure to capture the cost with CATS: 


Step 1. Maintain master data in the Project Builder (CJ20n):

Create Network activity, assign work center & Enter Work in Hours at network activity level

Whenever we assign work & work center, Person assignment tab will get activated


Step 2. Assign personnel number (HR master data) against network activity: 

Click on person assignment tab & assign HR Personnel


 Step 3. Distribute the work among the Personnel numbers: 

Allocate the work to HR Personnel assigned at Activity level

Save the Network.

Step 4: Enter actual working hours (T code- CAT2): 

Enter personnel number in the selection screen

Enter Network & activity number

Enter actual time against desired date to book time for this activity (lets us assume that he worked on 26th Oct for 5 hours)

Save the time sheet.

Step 5. Transfer the actual hours to PS (T code- CAT5): 

Next process is to Transfer actual time sheet hours to PS module.

Enter personnel number in the selection screen, 

Let's execute it in the test mode. 

We will get the details of actual hours booked for personnel number 1807. We will have to cross check all the details to proceed further. 

Press back & untick test run checkbox & execute again

When we execute it without test run, the actual hours will gets transferred to PS module 

Step 6: Check the impact of CATS confirmation on the Network Activity (T code- CJ20n): 

System status CNF gets activated because of CATS data transfer

Step 7. Actual cost report to check the impact of CATS (T code- CJI3): 

Actual cost gets posted for 5 hours’ time booking form CATS

Conclusion: 

Overall, the integration of SAP PS and CATS improves project management by providing accurate and real-time information on project progress, resource utilization, and costs.


Monday, March 13, 2023

Backflush indicator impact on SAP PS Network activities

Business Scenario: 

Backflush indicators in SAP PS (Project System) are used to automate the process of updating the production or manufacturing activities in a project. Backflushing is a process that involves updating the production activities and goods movement data in SAP PS after the completion of a production order. This process eliminates the need for manual updates, which saves time and reduces errors.
In this blog, we will discuss backflush indicators in SAP PS and how they work.

What is Backflushing?

Backflushing is the process of updating production activities in a project after the completion of a production order. This process is used to update the goods movement data and the consumption of materials used in production activities. The backflushing process eliminates the need for manual updates and reduces the risk of errors in the production process.

Backflushing is typically used in manufacturing or production projects where a large number of materials are consumed in the production process. The backflushing process updates the inventory data and the consumption of materials automatically, which saves time and reduces errors.

What are Backflush Indicators in SAP PS?

Backflush indicators are used to automate the process of updating production activities in SAP PS. These indicators are set up in the project profile and are used to determine whether backflushing should be used for a particular project.

Backflush indicators are set up in the project profile under the "Control Data" tab. There are two types of backflush indicators:

Automatic Backflushing: If this indicator is set, the backflushing process is triggered automatically when the production order is completed. The system updates the goods movement data and the consumption of materials automatically.

Manual Backflushing: If this indicator is set, the backflushing process must be triggered manually. The user must update the goods movement data and the consumption of materials manually after the completion of the production order.

How do Backflush Indicators work?

Backflush indicators are used to automate the process of updating production activities in SAP PS. When a production order is completed, the system checks the backflush indicator set up in the project profile. If the automatic backflushing indicator is set, the system automatically updates the goods movement data and the consumption of materials used in the production activities.

If the manual backflushing indicator is set, the user must manually update the goods movement data and the consumption of materials used in the production activities. This process involves updating the inventory data and the consumption of materials used in the production activities.

Benefits of Backflush Indicators in SAP PS

Time-saving: Backflush indicators automate the process of updating production activities, which saves time and reduces the risk of errors.

Reduced Errors: The backflushing process eliminates the need for manual updates, which reduces the risk of errors in the production process.

Cost-effective: The backflushing process reduces the cost of updating production activities by eliminating the need for manual updates.

Practical use of Backflush indicator: 
Step 1: Create a Project with WBS element, Network activities with Material component


Step 2: Release the Network Activity


Step 3: Confirm the network activity by using CN25 


Confirmation in PS results automatic goods issue of material components which were assigned to the same network activity. 

Please note that Confirmation through CJ20n, will not have any impact on Backflush indicator.

Step 4: Check the actual cost line item report (CJI3)


Check the material document (MIGO > Display > Material Document),


Backflush indicators in SAP PS automate the process of updating production activities after the completion of a production order. These indicators save time, reduce errors, and are cost-effective. By using backflush indicators, businesses can streamline their production processes and improve their overall efficiency.

Concept of Subproject in SAP PS module


Business Scenario:

In SAP PS (Project System), the subproject concept is used to divide a larger project into smaller, more manageable parts. A subproject is essentially a mini-project that is part of a larger project and has its own set of deliverables, budget, and timeline. In this blog, we will explore the concept of subprojects in SAP PS and how they can be used to improve project management.

Subproject Concept in SAP PS

The subproject concept in SAP PS involves breaking down a larger project into smaller, more manageable parts. Each subproject is managed as an individual project, with its own WBS (Work Breakdown Structure) and project team. A subproject can be used to manage specific deliverables within the larger project or to manage a portion of the project that requires specialized expertise or resources.

The subproject concept in SAP PS is closely related to the concept of the project hierarchy. The project hierarchy in SAP PS is a way of organizing projects and subprojects into a tree-like structure, with the main project at the top and the subprojects below it. This hierarchy can be used to provide a clear overview of the entire project and the relationships between the different subprojects.
Benefits of Subprojects in SAP PS

There are several benefits to using subprojects in SAP PS. These include:

Improved Project Management: By breaking down a larger project into smaller subprojects, project managers can better manage the project and ensure that each deliverable is completed on time and within budget.


Clearer Communication: The subproject concept in SAP PS provides a clear way to communicate project goals and expectations to team members, stakeholders, and sponsors. It also provides a clear structure for reporting on project progress.


Resource Optimization: Subprojects in SAP PS allow project managers to allocate resources more effectively. They can assign resources to specific subprojects based on their skills and expertise, which can lead to better project outcomes.


Greater Flexibility: The subproject concept in SAP PS allows project managers to make changes to the project plan more easily. If a specific subproject is not going according to plan, it can be adjusted without affecting the rest of the project.
Practical use:
Subprojects are an essential tool in SAP PS (Project System) for breaking down larger projects into smaller, more manageable parts. They allow project managers to better manage specific deliverables within a larger project or manage portions of the project that require specialized expertise or resources. In this blog, we will explore the subproject concept in SAP PS, its benefits, and its applications in project management.

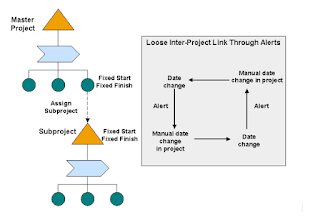
When you work with subprojects, a task of a project is created as a separate subproject, for example, because a different department or a subcontractor is responsible for the task. To map this relationship, you create an inter-project link between the task of the master project and the project definition of the subproject.

A task of a master project can only ever be linked to a single subproject. The subproject can, however, also be the master project for other subprojects which enables you to map multilevel project hierarchies.

The following graphic explains the scenario:


1. Subproject Field as Label

The subproject field works as a labeling mechanism that enables you to organize and manage WBS (Work Breakdown Structure) elements hierarchically. Each subproject is identified by a description that is defined in the WBS element. When you subdivide the WBS element at a later point in time, the subproject's assignment is copied to the new lower-level WBS elements. This ensures that the subproject's scope is retained across the WBS hierarchy.

2. Transferring Prize Agreements between WBS Elements

Subprojects can be used to transfer prize agreements between WBS elements. To achieve this, you divide the work breakdown structure into subprojects. A subproject is made up of WBS elements hierarchically connected. After creating the subproject and assigning it to the WBS element, the system will give you the option to select the subproject in budgeting. This allows you to control the budget area-wise, making it easier to monitor resource utilization and track expenses.

3. Budget Control using Subprojects

If the company is using intracompany billing or transfer pricing between departments, subprojects are a helpful tool for controlling the budget. In this scenario, you can create Level 2 WBSE for each department and create other breakups for each department under it. In dynamic selection of project report, you can mention the project type so that you can get the report for a department. Using subprojects in this way enables you to allocate resources more effectively and optimize the use of available funds.

4. Application in Project Management

Subprojects in SAP PS are a powerful tool for managing complex projects. By dividing a project into smaller subprojects, project managers can improve project management, optimize resources, and provide clear communication and reporting on project progress. Each subproject is managed as an individual project, with its own WBS and project team. The subproject concept in SAP PS allows project managers to make changes to the project plan more easily. If a specific subproject is not going according to plan, it can be adjusted without affecting the rest of the project.
Configuration T code- OPUM
Conclusion

In conclusion, the subproject concept in SAP PS is a powerful tool for managing complex projects. By breaking down a larger project into smaller, more manageable parts, project managers can improve project management, optimize resources, and provide clear communication and reporting on project progress. The subproject concept is an important part of the SAP PS module and should be considered for any project that requires complex management.

MM17- Material master mass update

Update planned delivery time in Material Master data Concept: The MM17 is the mass maintenance transaction in the SAP. MM17 executes transac...